


Hallo..now we’re gonna create a piece of watermelon. We’re gonna make it realistic by texturing it using 3ds Max Unwrap UVW. Let’s go to step 1.
1. Create this model. It's an editable poly created from a sphere divided into four pieces, see pic 01.

Pic. 01
2. Select the model, click the modifier list roll out, scroll down and select the Unwrap UVW.

Pic. 02
3. In unwrap UVW options, select Face and select all the face of the model.

Pic. 03
4. After selecting all the faces, click edit button, its gonna pop up an edit uvw window.

Pic. 04
5. In edit UVW window, click mapping tab and select Unfold Mapping and click OK.

Pic. 05
6. In edit UVW window, click tool tab and select Render UVW Template.

Pic. 06
7. Save the rendered UVW Map as a JPEG file.

Pic. 07
8. Open the rendered UVW Map in Photoshop or Corel Draw. We’re gonna make this rendered UVW map as a template to make a watermelon texture for the model. See the result in pic 08.

Pic. 08
9. After we’ve done with the texture in Photoshop, go to Material Tab in 3ds Max and create a new V-Ray Material.

Pic. 09
10. In V-Ray material ‘Basic Material Tab’, click the square button next to difuse color and select ‘Bitmap’.
Browse to find the bitmap or jpeg that we’ve made in Photoshop before and select it as the texture. 
Pic. 10
11. Now we have this material. Select the model then assign the material.

Pic. 11
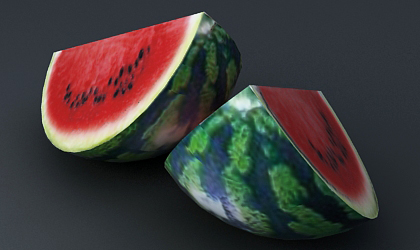
12. Hit ‘Render’ and see the result. For a better result add a light and set the renderer parameter.

Pic. 12
12. That the last step, hope you like it and keep visiting my blog. Thanks :)..


0 comments